By Brendan Cunningham
Aston Martin DB7 Vantage
Should you ever customise an Aston Martin?
Too late - way past the point of no return!

Please note that the bonnet vents above are not standard.

Please note that the boot spoiler above and below is not standard and is unique to this vehicle.

Please note that the gear lever surround below is not standard.

These are my personal views, opinions and experiences. You are welcome to agree or disagree with any or all of them.
Introduction:
I didn't plan from the outset to modify my DB7. However, as I became more familiar with it I did find things that I felt could be improved.
However, I had to be very careful and think long and hard about any modification I intended to make.
Modifying a car just to make it different could so easily at a stroke make it less desirable than a standard car (we have all seen cars that fall in to this category). I realised that every change I make still posed a risk down the line. So with this in mind I have tested every planned change against the following criteria:
a. Does it enhance function and/or convenience?
b. Is any visual change subtle and sympathetic? (I know this is a very subjective criterion)
c. Would it pass for OEM?
To pass my test it has to be a "Yes" for a. or b. and must always be a "Yes" for c. Basically an observer not very familiar with DB7s should assume everything is as it came from the factory and OEM.
This has meant meticulous attention to detail, both in execution and for future care (for example, mods involving any wiring changes mean fully detailed updates to the wiring diagrams in my workshop manuals).
At various car meets this approach has so far been widely vindicated by the comments made. The consensus of all those who have seen the car is that the desirability has increased rather than decreased (of course there will have been those with a different view who kept it to themselves).
I didn't plan to make any modifications to the car's powertrain, brakes or suspension, but did intend to overhaul and renew as required (Note** this was until a new gearbox opportunity came along - see later).
The car had the factory sports exhaust and mesh front grille fitted as options already.
1. Full respray.
The paintwork was fine, but had minor imperfections inevitable on a car that was 14 years old. This included a questionable colour match on the nose cone following a pre-purchase stone chip removal respray. There was also a slight patch of bubbling on each of the front and rear screen frames and the same inside the O/S rear wheel arch lip. None of these were bad and very easily missed, but I didn't want to live with "fine". I plan to keep this car and only "A1" will do.
The car was taken to Paint FX in Kettering for full respray. The owner of Paint FX, Tim, was happy for me to work alongside his team which allowed me to keep costs down and get to know and work on the bodywork underneath at the same time (please do not expect this option if you take a car to him for a respray).
The car was fully stripped, including removal of front and rear sections, side skirts, lights, handles, both front and rear screens.
Once stripped down, the state of the bodywork could be properly assessed.

What looks like rough welding at the front of the sill box section in the photo above is in fact mastic. Both sides were the same. No damage and no rust, other than some surface staining around the front jacking point. Phew!
Having been warned about rust on these cars I was very pleased to find that there was no evidence of rust at all other than minor surface blemishes on some edges under the car. In this case the scaremongers had it wrong (for my car at least), in fact, while at the paint shop several mainstream vehicles of similar age came in with far more serious MOT-failing rust.

The bubbling in two places around the screens turned out to be caused by clumsy previous glass replacement and not more serious rot. The bubbling was purely a surface blemish (Note – I was present for glass refit and great care was taken to ensure no repeat). Likewise, the bubbling in the rear wheel arch was also surface deep.
The tray below the scuttle in front of the windscreen was totally rust free.


As you can see we stripped the car pretty comprehensively. I made patterns for the bonnet vent cutouts and it was definitely a case of measure ten times, cut once! The headlights were dismantled and cleaned. Again, no rust was found, just some flaking of the rubbish paint AML applied to the nosecone brackets. While the receiver drier was so accessible I had it swapped and an A/C service carried out.

Just before reassembly I went mad with the Waxoyl. The lack of rust was again very encouraging!
The respray involved extra thick lacquer and subsequent flatting and polishing over several days to achieve the desired finish which has been very much admired.
When reassembling the car I decided for longevity to use copious amounts of Waxoyl on “under” surfaces rather than aim for a concours paint finish in areas which only a "concours judge" would ever look.
2. Bonnet vents
The large V12 engine in an engine bay originally designed for a straight six can lead to a very warm engine bay indeed. Later V12 Astons have vents in the bonnet to allow excess heat to escape, including the DB7 GT/GTA, but one of these bonnets was not an option for me due to horrendous cost - even second hand.
I chose vents from a Jaguar XK, so the DNA fits given the car's underpinnings.
The GRP units needed fettling to fit and placement was critical for clearance (very tight) and minimal bonnet structure cutting. I used GRP pattern vents from Ebay rather than OEM ABS because they were easier to adapt to this install (in the GT/GTA the vents had to be put in raised humps). I also didn't want to fit the OEM Jaguar vents because they feature "supercharged" lettering and my car isn't supercharged.
The amount of heat coming out of these when parked up is amazing. I think they look rather good as well (only those who know the DB7 notice they aren't standard).


The mesh keeps out debris and strengthens the delicate lips of the vent louvres.
The picture was taken before the post spray-job polishing was completed and before I cleaned up all the inevitable mess this makes.
3. Wiper update
The above pictures of the bonnet vents and the picture below clearly show the wipers. If you haven't spent some time in a DB7 you wouldn't know about these.
The standard later i6 and all Vantage wipers feature a pantograph arrangement for the driver's side to ensure maximum screen wiped area. This is quite delicate, unsightly, wears and is expensive to replace. What is more, to accommodate the pantograph arm the wiper sits higher than is ideal on the spindle.
The fixing on the driver's side also means that modern low profile blades won't fit. So, the wipers sit very high spoiling the looks of the car and virtually obscuring the view of the passenger. Add to this the old fashioned on-arm washer jets and you have, in my eyes, an unsatisfactory set up.
If you study the above pictures the wipers look utterly unremarkable, but this was more difficult to achieve than you might think.
The spindle ends of the wiper arms are Aston Martin, the blade end of the arms are Fiat Doblo. Getting the angles of these right took a while before final welding! Then came the complication that without the cantilever, the driver's side wiper now wiped too large an arc to contain on the screen. This meant some tweaking of the main wiper motor drive arm to reduce its radius and achieve the desired effect. I don't get quite the same area of wipe, but plenty good enough.
At the same time I decided to go to more conventional washer jets - visible on the scuttle.

4. Rear boot spoiler.
The later GT and GTA DB7 cars have a different boot lid with a duck tail type flick at the rear.
Used boot lids like these are very hard to find and very expensive, but also, because the built-in spoiler has to blend from nothing to full height within the width of the boot lid they visually make the rear end of the car look too narrow in my view.
So, I decided the make a stick-on spoiler which could be wider than a GT/GTA version. I found a GRP Ebay item made for a Mercedes CLK. It didn’t fit of course and was the wrong shape, but had potential and was cheap enough to try with financial minimal risk.
The spoiler needed cutting apart and then reshaping and twisting to follow the DB7’s lines. I achieved this by making a jig which allowed me to apply force accurately to get the shape right. The core of the spoiler was then filled with chopped strand glass mat and resin to make sure it held the new shape once released from the jig. Then the base of the spoiler had to be shaped to suit the car.

A very cheap damaged bootlid was used as a perfect pattern and jig base for the spoiler fitment.
I spent many hours finishing the spoiler shape.
Being a stick on item, after applying the foam tape, but before “peeling and sticking” I tried the spoiler on and off and on and off and on……….
The real decider was that when removing the spoiler the rear looked too "droopy". This was highlighted at a recent car meet where the comparison could be made instantly between two DB7s, one with spoiler and one without. The consensus was that the spoiler was a definite enhancement and I had numerous enquiries about making some more.
I never did make any more so this is yet another totally unique feature of this car.


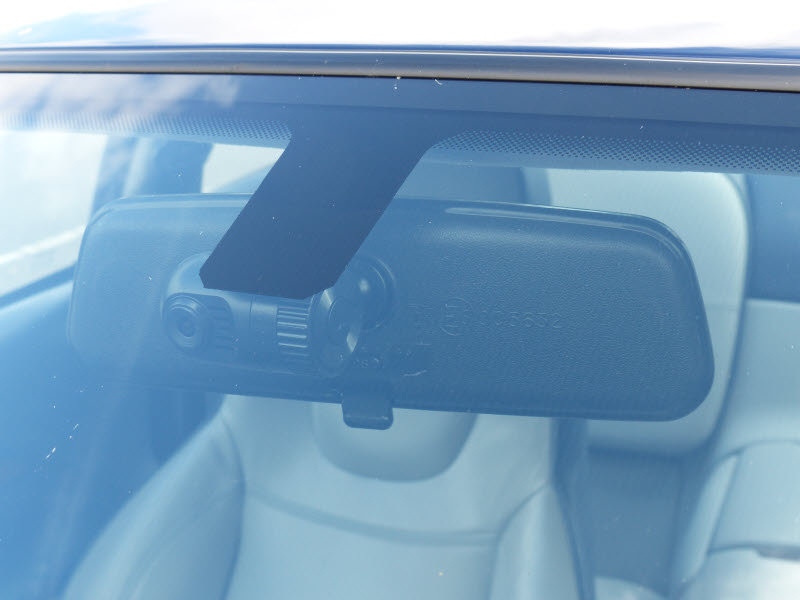
5. Ultra discrete traffic camera install.
With the standard of driving falling in direct proportion to the number of cars on the road I decided to add the peace of mind accessory of a traffic camera/recorder. There was no way I could live with the standard arrangement obscuring part of the screen and trailing wires. I bought a very small camera (small because it has no screen) and before the front screen was put in following the respray, I extended the black area below the mirror mount. This was to avoid seeing the unsightly adhesive pad of the camera mount. The wiring was quite tricky. I had a +12V and Earth wires for the interior lights, but also needed a 12V ignition feed to activate the camera automatically whenever driving. I eventually managed to route a cable through the headlining and down the C pillar to the boot area. The supply has its own fuse and the appropriate wiring schematic added to the correct page of the workshop manual.
6. Daytime running lights.
As all exterior bulbs are now LED (apart from HID dipped beams) and the front side lights much brighter and whiter than the originals I decided these would make excellent daytime running lights (DRL) and better still look OEM rather than the usual obvious add-on.
I inserted a changeover relay into the supply for the front side lights to operate with the following function (wiring diagrams updated in manual):
IGN on - front sidelights operate as DRL powered from IGN feed. The rest of the lighting circuit is isolated.
Sidelights on - the sidelight feed triggers the relay to changeover the front sidelight supply to the lighting circuit, isolated from the IGN supply.
7. Sound system upgrade.
I want very good sound, but an also want an installation that looks as understated as possible within a sensible budget.
The first dilemma is the head unit. The Becker single DIN variants blend in well visually, but are now just too out of date - including the Becker NAV upgrade.
I had an Alpine unit which looked OK, but eventually bought a higher end Kenwood DAB unit which has a relatively plain facia and is able to display any colour and brightness and blends in perfectly well.
The head unit now fitted has DAB and so a new aerial was needed capable of good DAB reception in weak signal areas.


I also had an Aux input and 2 X USB inputs which I threaded through to the cubby beneath the arm rest.
Luckily my centre console mod meant that the gear gaitor unclips to gain access to guide the cable through.
The microphone for the phone connectivity was simple to press behind the A pillar trim for a neat (no wires visible) install at the top corner of the screen.
The sound was already much improved apart from weedy and thin bass.
Ninety percent of an amp's power is used kicking out bass - large mass, large movement. I didn't need a multi-channel amplifier, just a decent single unit to drive a subwoofer which would need to be added.
Out went the CD changer (one of the USB inputs holds a flash drive with hundreds of high bit rate tracks, so CD changer not missed).
In its place went an Alpine mono subwoofer amp. This was a doddle to wire up as the power aerial lead turns it on and the battery is just next door to hook up the fat power cables (through a fuse of course!).

The physical mounting was tricky to fit in the space and necessitated a fabricated bracket at an angle to get clearance and access to the controls.
The DB7 is an awkward car to fit a sub into because the fuel tank is in the way. This proved quite a challenge.
Step one was to cut a hole in the rear deck above the fuel tank (only really possible/safe with the rear screen removed (mine was during its respray).

Step two is to cut a hole in the nice expensive leather and fit a new grille above the new hole.

Step 3 is to get hold of a shallow 10” sub in a shallow enclosure and find a way to mount it.
My car didn't come with the factory premium sound system - but this was no big loss as the one I heard was nothing special despite the big amp in the boot, but the big amp mounting brackets were still there in my car. This allowed me to make a custom ply faceplate, some angled sides to allow clearance and sound passage and bolt the sub enclosure in place just clear of the boot floor.
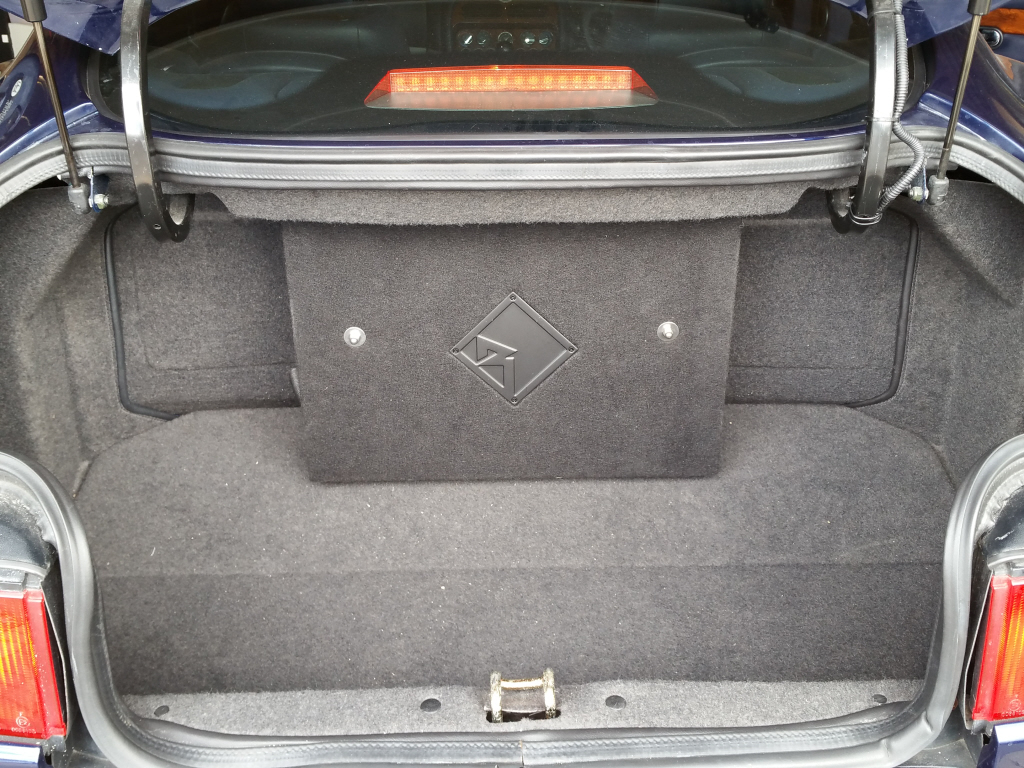
You can see how shallow the enclosure is by the amount of space still left.

Best of all, because the sub is attached to the rear of the tank and not the boot floor the cover still lifts out to get access to the boot “basement”.
As I bolted through the speaker enclosure (Rockford Fosgate P3S-1X10) I had to add extra bracing to prevent the cabinet being distorted/damage when the bolts/studs are tightened. This extra bracing working against the tension in the bolts greatly increases the enclosure's rigidity - improving its performance above standard. Bonus!

The difference in sound quality is incredible with wonderful rich (but not overpowering) bass.
Couple that with the multiple inputs, crystal clear DAB and phone interface and we have a proper entertainment/communication system. Well worth the trouble.
I did consider making a pop up double din arrangement with SatNav that would pop out of the top of the dash, but this much simpler package is more than adequate for now.
8. Touchtronic retrofit / upgrade.
One thing missing from my car was the Touchtronic option. I have owned BMWs with this system (Steptronic) and really thought it made the DB7 more pleasurable to drive on the examples I test drove.
I had originally had Touchtronic on my “must have” list when searching for a car, but as it happened the overall package of the car I bought justified its omission (at least temporarily).
The good news is that this is a more of an "enable" job as opposed to a "retrofit" because all the later cars already have the correct transmission controller, with wires in the loom ready to accept manual shift switching, be it by using the shift lever or buttons on the steering wheel.
The simple solution would have been to buy second hand AML parts, but these are rare and having discovered that the DB7 Touchtronic gear selector was simply an ancient BMW variant I felt more comfortable looking for a newer, better alternative.
I also discovered at the same time (2016) that Chiltern Aston were selling off old stock of genuine Touchtronic steering wheels (including air bag) which I bought. This is a very simple plug and play.
I have always thought that the DB7’s gear surround looked cheap and nasty and spoiled the nicely finished interior. The Touchtronic version is no better and with used, shabby surrounds costing silly money I decided to upgrade. I tried several variants but finally settled on a surround from an Audi TT. Luckily I have done some retrimming before and had some matching blue leather ready for a future headrest upgrade.
The “S” on the display now comes on with the +/- when you select “Sport” by moving the gear lever sideways.
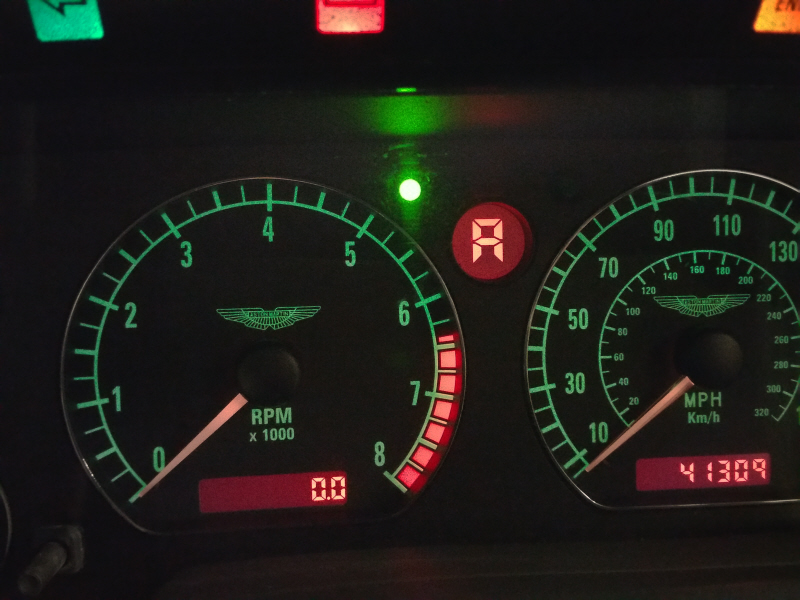
When a used Touchtronic instrument cluster came up on Ebay shortly after I bought the car I snapped it up (more recent ads have been asking £1000!).
I wasn’t sure if the gearbox controller needed to talk to the cluster via the CAN Bus, making the cluster a necessary retrofit component. Well, as it happens the system works perfectly happily without the matching instrument cluster, but I had it so it would be included.
The problem was the odometer reading. Nobody wanted to try and “adjust” it and I didn’t want to jump from 41,000 to 65,000 miles overnight. Time for more DIY. Luckily, the circuit boards are identical on both variants. This meant I could dismantle both units and make up one which shows my 41,000 miles and has the Touchtronic display.
As for all my mods updated my printed workshop manual with the new wiring so that any competent service agent can see what’s what if and when I sell the car.
So, what does this look like installed and should I have gone for a genuine DB7 gear surround?
First a picture to compare the Aston version and the my version of the gear surround.

And here is the finished install.....
The above picture also shows the Touchtronic instrument cluster and steering wheel - and the later turn indicator LEDs added to the cluster. The paddle shifters and updated dot matrix gear display were not fitted at this stage.
A note of caution to anyone else considering using the Audi TT surround - the lever throw just fits into the smaller opening and I used a later BMW shorter throw selector. So I cannot guarantee this would work with the standard older selector.
Although not standard in some minor detailing ways, this retrofit functions identically to the standard Touchtronic car in that it uses the same gearbox, and gearbox ECU and main loom wiring. Consequently it posed no problem with my insurance company.
I have yet to find anyone who does not prefer the look of my gear surround over the original.
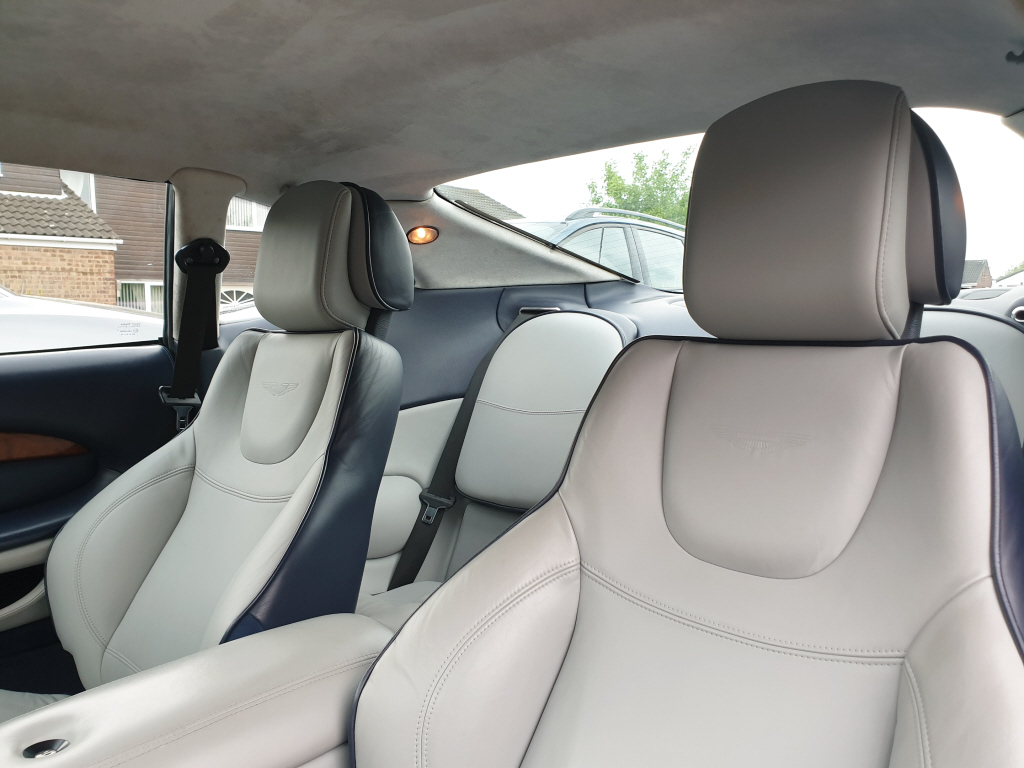
9. Head rest pads in matching leather.
The head rests in the DB7 are not really head rests because you need to tilt your head back at an uncomfortable angle to make contact. They are head restraints. I have a minor neck problem and do like to occasionally rest my head on a head rest while driving. For one crazy moment I considered trying to find some optional sports seats (standard in the GT/GTA) but was put off for three reasons, huge cost, when I sat in them they actually felt less comfortable than the standard seats and the head rest area was actually worse and finally I don't think they look right in this grand tourer.
SO, I decided to keep the seats as they were but modify the head rests.
The result had to look like OEM (but not OEM from the 1970-80's ruling out an "old-school" strapped bolster pad). Also, unhelpfully the head rests don't lift out of the seat. This was going to be a real challenge to get right. Anyway, not deterred I pressed on and achieved the following result. This is another one of those mods where the unfamiliar won't accept that they aren't original, let alone unique!
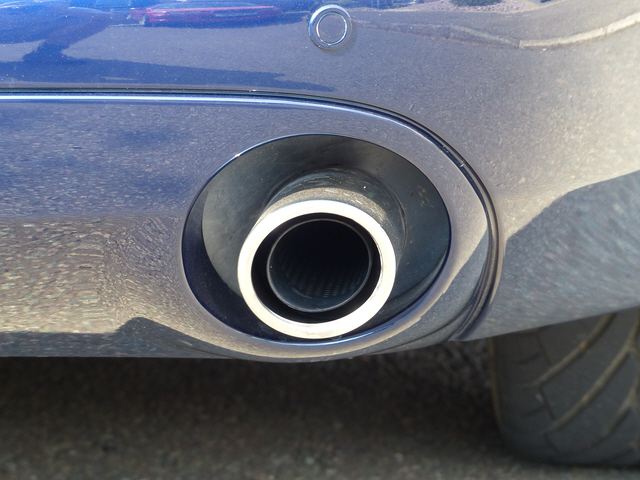
10. Tail pipe aperture sealing.
A very small modification, but visually makes quite a difference. Usually the exhaust silencer and boot floor are visible through the aperture. I have fixed 5mm thick black silicone sheet around the tail pipe. The silicone is heat resistant and very flexible. Next will be splash guards for the rear of the rear wheel arches as these are very exposed and make the car look open and hollow at the rear as opposed to being carved from solid rock...
11. Rear Wheel Arch Protection.
The rear of the rear wheel arches are completely open alowing all kinds of crud to splatter over the exhaust, exhaust mounts and the vulnerable rear bumper moulding supports. Another very small modification which meant shaping a suitable piece of black plastic sheet and mounting in the wheel arch. It also visually makes the car look more solid in this area (it isn't, but looks it).
12. Lighting upgrades.
Dipped beam bulbs are HID. The light from the HID units is so good the main beams are not really necessary (unless you drive really really fast along country lanes at night - I don't), so I have used LED bulbs in the main beam units. These are easily bright enough to fulfill their most important function - flashing or FTP. The front fog lights are also LED as the last time I remember fog thick enough to need "fogs on headlights off" was decades ago. Just been through its MOT with no issues, though next time I may need to temporarily swap the main beam bulbs back in due to new regulations.
All other exterior bulbs are LED. This meant new electronic flasher units to avoid fast flashing of indictors (one bonus is that I can now hear the indicators ticking) and load resistors in the brake light circuit to prevent brake lights glowing when side lights turned on.
As part of the LED makeover the amber repeaters were swapped to clear versions.
Interior lights remain as standard as warm white suits the ambience.
13. Trickle charger upgrade.
The AML charger is certainly expensive, but not that special. The three pin connector is purely to ensure correct polarity as only two are connected. I tend to leave my car plugged in whenever not in use and not just when left for long periods. This practice with a good CTEK charger over several years has meant I have never had to replace a battery in 30 years of owning "weekend" cars (most worth way under £10k until now).
Plugging the AML charger in regularly is a pain as it means leaving the boot open and lifting the boot floor. To make life easier I have added a second charge connector under the fuel filler flap. This has a silicone rubber sealing cap and is completely waterproof. I have a hanging power lead which means simply lifting the filler flap and plugging in.

14. Rear badging
While removing the rather cheap looking plastic DB7 and Vantage badging in preparation for respraying some of the location pegs broke off despite great care being taken. I decided to abandon originality in favour of what I regard as a more subtle and aesthetically pleasing result. We filled in the locator holes and when all done, used a small discrete V12 badge from a V12 Vantage - so you could almost say it was made for the job! I have kept the original badging in case any future owner wants to use it.
15. Indicator tell-tale light modification.
The steering wheel totally obscures the indicator tell-tale lights above the instrument cluster. This means that if the car doesn't auto cancel and the driver doesn't cancel and doesn't hear the quiet ticking of the flasher relay he/she will drive down the road confusing and annoying others.
The solution was simple in principle, but fiddly to get right in practice if it was to look OEM.
In the picture you CAN see the original tell-tale light, but only because the camera was resting on the steering wheel centre.
17. Paddle shifters on the steering wheel.
The standard buttons are an excellent example of poor ergonomics. They just don't feel nice to use and so I didn't use them.
All later Astons have paddle shifters but using a later wheel takes you down a rabbit hole of other complexities (air bags are not mix and match!) and I really wanted to keep the DB7 interior looking like a DB7 despite my other improvements.
I sourced some JLR shifters and these were grafted onto the back of the steering wheel by cutting away the foam and drilling and tapping the steel spoke beneath. They work very well and again have been assumed to be OEM. Again I have been asked to convert other steering wheels, but as yet this remains the only one.

18. 6 Speed automatic gearbox conversion.
* How did it come about?
I began to notice the original ZF 5HP30 auto box to occasionally shift slightly less smoothly, particularly the 3-2 downshift off load - something many wouldn't even notice and most would ignore, but being super fussy it was something I wouldn't tolerate. It took a while and visits to more than one specialist for the proper diagnosis to finally be made, but it was a bad day when the problem and required work to fix it was finally revealed. A total rebuild was going to be needed!
It appears that coolant had seeped into the gearbox ATF. The only place this could have happened is in the main radiator where there is also an ATF heat exchanger. We think that a pinhole was the most likely culprit. Water would only get into the ATF (not the other way round) and only in tiny amounts when the coolant was pressurised.
You can’t see the leak, the water loss from the coolant can be too small to notice and you can’t see it in the ATF, but water in the system is very bad news.
This is a very serious cautionary tale to any owners of these cars. I would be very wary of any DB7 Vantage still fitted with its original radiator as even the youngest will be approaching twenty years old now.
The fix would begin with a new radiator. I fitted a genuine new AML unit (the latest version is all aluminium without the plastic end caps). Let me tell you, it's a tight fit!
Then it would need a full transmission rebuild. I was facing spending thousands to rebuild a mere 40,000 mile gearbox and torque converter to end up just where I began.
Having shared my experience on the Aston Martin Owners' Club forum, Richard Furse of Gearbox Developments and responsible for the auto option in the half million pound Callum Vanquish 25 approached me with a proposition.
He offered to use my car as a prototype for the installation of a 6 speed auto gearbox and control system as a more modern upgrade for a fraction of the cost of buying the developed "retail version".
* Why did I agree?
Well, apart from the fact that I needed a total gearbox rebuild anyway, from day one of ownership it became apparent to me that the gearing of the V12 DB7 felt slightly compromised. It felt like the overall ratios (gearbox and diff) were not making the most of the engine’s potential. It felt as though there was a trade-off between acceleration and keeping cruising revs down to a reasonable level. At least it needed a wider spread of ratios or better still, an extra gear. It’s not awful by any means. I just felt it could have been an awful lot better.
An extra gear appeared the obvious answer. It was not much of a surprise when I was told by AML insiders at the DB7 25th anniversary event that the original gearbox had been a question of what they could get hold of rather than what would be ideal and the best match.
As well as a 6 speed being better to drive, my car would at first be unique and always be super rare among DB7s worldwide.
However, by being very rare I absolutely did not want it to also be dificult to fix should any issues arise! Luckily the gearbox Richard would use is a standard GM unit which can be rebuilt for less (last time I checked in the UK) than the cost of the original. Obviously there would be a unique bell housing, but unlike the ZF unit this is separate to the gearbox, again allowing for a totally standard gearbox body to be used. The new custom gearbox controller would plug into the existing DB7 connector/wiring which does not need changing. One point definitely worth emphasising is that the new gearbox and torque converter being fitted are NEW, that is brand new from the factory and not reconditioned, so any rebuilds should be a very long way off!! Anyway, the whole thing will have a warranty from GBD Ltd and they tend to offer a collect and return service in many instances.
* The plan.
Richard would adapt his previous work on the Newport Pagnell Vanquish and the Callum Vanquish 25 to fit the DB7.
He would use the same gearbox (GM 6L80). The choice of a GM box rather than the seemingly obvious ZF unit as fitted to the DB9 is because GM allow third party transmission specialists access to the gearbox control software and ZF don’t.
Proper full access to control software along with a deep understanding of its function and experience in setting it up is crucial and why custom auto gearbox installs are super rare. The mechanicals are doable by many workshops, the computer control systems and the successful marriage bewteen engine and gearbox parameters are definitely a much more complex issue best left to the handful of companies across the world which specialise in this.
I waved my car goodbye and it was trailered away by Richard to Gearbox Developments’ workshop in North Wales.
The first and arguably the most important question was, would the GM gearbox fit? We had measured things repeatedly and we knew it would be close.

The chassis/body tunnel edges can be seen marked in red - it's a tight fit in there with the original 5HP30!
 Photo courtesy of R.Furse.
One of those Eureka moments - Using a spare empty casing (much lighter!) to see if it fits - and it does!
From then the full conversion process took its painstaking course. There was a lot of bespoke work needed as well as the custom transmission control module developed in the USA.
Gearbox swap V1.0 made its debut at the DB7 25th Anniversary event (September 2019) where it sat beside another prototype - the original TWR DB7 prototype.

Having shown the conversion worked in principle, Richard was keen for it to be refined further and because I like things to be as good as they possibly can be, I agreed to him keeping the car to produce Conversion V2.0.
Gearbox swap V2.0 arrived back on my drive in April 2021 - yes, over a year later, but these have been far from ordinary times.
It looks like this:

The car had already been driven several hundred miles with an engineer from the Callum Vanquish 25 project for initial calibration, but I then also drove the car for several more hundred miles to Beta Test and feedback for further calibration tweaks. Even before these final adjustments it was immediately clear that the extra gear had transformed the car. Driving at anything above 45mph was now much more relaxed and I had the distinct impression that this was how the car should have been built in the first place if Aston had had access to a 6 speed auto at the time (which I now know they didn't). Going back now would be like going from colour TV back to black and white.
Fuel economy was now regularly into 24/25mpg. Obviously, "spirited" driving would reduce these, but either way, a huge improvement.
Calibration and tweaking is still ongoing. Initially there were still some rather clumsy shifts taking place (2/3 upshift under heavy throttle for example), but an engineer sat beside me with his laptop plugged into the gearbox while we clocked up more tanks of fuel (this time with me driving) in the next phase of calibrating the shifts. To be fair, even when the shift patterns and shifts themselves have been fully tweaked the gear changes will never be quite as slick as say a modern ZF 8 speed unit in a BMW (or Aston), partly because these are even newer generation, partly because they are "fly by wire" and don't rely on throttle cables as are found in the DB7.
Having said that, the feel is now like a mildly updated and improved original auto, with the huge (and I can't overemphasise this enough) huge bonus of a full set of more sensible gear ratios.
Was it worth the very long wait? For me, absolutely. I have no idea what a production "conversion kit" is likely to cost however, it certainly won't be cheap, so potential future "convertees" will need to decide for themselves.
19. Gear display update.
One last job I needed to do was to replace the original 7 segment LED gear display with one compatible with the new controller. This was fiddly, but the result looks like this....

Because this display always shows which gear you are in even in regular "D", I added another LED to act as a tell-tale for the Sport mode light. The original Sport mode light is so well hidden by the steering wheel rim that I didn't even know it was there. The new tell-tale looks like this....

